

To hide the Blogger NavBar:
- Log in to blogger
- On your Dashboard, select Layout. This will take you to the Template tab. Click Edit HTML. Under the Edit Template section you will see you blog's HTML.
- paste the CSS definition in the top of the template code:
#navbar-iframe {
display: none !important;
}
Remove the code to show it again.
Remove the NavBar

![]()
Nine Things For Newbies
Your AdSense application has just been approved, and you've got a world of new information to absorb. Google Have highlighted some key resources to answer all the questions you have about AdSense (but were afraid to ask).
1. First, you can see Google's handy Quick Start guide to learn how to access your AdSense account and customize your ad code before pasting it into your site. For a more detailed walkthrough, see the Help with Ad Code demo.
2. Once you've added the code to one website, you may want to add it to more of your sites or pages -- the ad code will work for any page or site.
3. Once your ads are up and running, it's time to think about getting paid. The Payment Guide provides a broad overview of AdSense payments, or you can find more in-depth information by watching the Payment demo.
4. If you start to see ads that you'd prefer not to display on your site, don't worry. You can prevent these ads from appearing on your site by using your Competitive Ad Filter list to block them.
5. Are you having trouble with the ads on your site? You can use one of our troubleshooting wizards to sort out the issue, or browse our Help entry on Public Service Ads (PSA's).
6. Familiarize yourself with other AdSense features and products to monetize your site even further: AdSense for search, referrals, and Onsite Advertiser Sign-up that can help you earn more revenue from your site.
7. Concerned about keeping your account in good standing? You can review the program policies for a comprehensive list of do's and dont's or Google's ten suggestions to help ensure your account won't be disabled.
8. Optimize! Our Optimization Tips will help you earn more and get the most revenue from your AdSense account.
9. Acquaint yourself with the AdSense Help Center. It's the quickest way to get the answers you need at any time.
Now you can get on the road to becoming a successful AdSense publisher...and start driving!
![]()
eCPM -- what exactly is that?
eCPM is a bit of industry shorthand that seems here to stay. You've seen it listed in your AdSense reports; it means, "effective cost per thousand impressions." So how is eCPM calculated, you ask?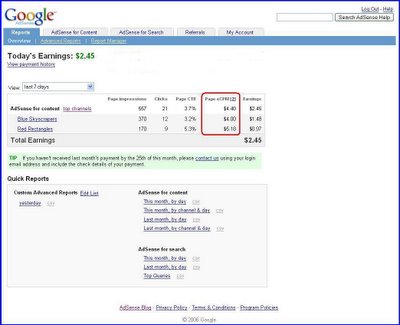
eCPM is calculated by dividing total earnings by total number of impressions in thousands. It is a great performance measure for your various ad units, so when experimenting, you can use eCPM to compare your results.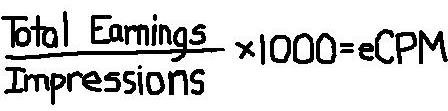
But what if your site doesn't receive enough impressions to have a large sample size? Even for smaller sites, eCPM can be a useful statistic to track ad performance.
For example, let's imagine we have two custom channels named 'Blue Skyscrapers' and 'Red Rectangles', respectively, which reflect the types of ad formats we're testing on our site. During our test, the 'Blue Skyscrapers' channel receives 370 page impressions and $1.48 in total earnings. The 'Red Rectangles' channel receives 187 page impressions and $0.97 in earnings over the same period. To make these figures more comparable we calculate eCPM -- i.e., the estimated earnings for every 1,000 impressions received. We find that eCPM for blue skyscrapers is $4.00 while the eCPM for red rectangles is $5.18.
This means if we received 1,000 impressions of blue skyscrapers, we would earn roughly $4.00. But for 1,000 impressions of red rectangles, we would earn about $5.18. Therefore, assuming that our sample size is large enough, it is to our advantage to switch to red rectangles throughout our site because they generate more revenue per impression.
![]()
Subscribe to:
Comments (Atom)
